How to Install E-Z LOK Knife™ Threaded Inserts in Hardwood
E-Z Knife threaded inserts for hard wood are ideal for assembling and disassembling furniture, cabinetry, partitions and more. E-Z knife inserts for screws are available in brass and stainless steel options for durability that will last years. You can use these knife inserts for those "tough to work with" woods such as oak, cherry and maple, and to help protect your future projects against thread erosion or stripping.
An E-Z LOK™ knife thread insert is ideal for hard wood applications where assembly or disassembly could lead to thread erosion or stripping. Before starting your project and ordering your inserts, however, we highly recommend testing your application — hard wood insert hole size requirements can vary based on many different factors, including the type of wood and the tools you'll be using.
No matter the job, you can count on E-Z LOK female threaded insert for wood to provide serious holding power, thanks to the proprietary external knife thread used to slice into the wood. And, thanks to the easy installation process, you'll be able to work quicker and get unmatched results. Keep reading to learn more about E-Z LOK knife threaded inserts for hardwood.
Installing E-Z LOK Knife Inserts
It's easy to install E-Z LOK wood inserts. Threaded insert installation only takes a few minutes, and requires only a few steps to follow.
E-Z Knife threaded inserts are typically installed with the slots up. The slots accommodate a screwdriver or E-Z LOK drive tool. For harder woods, screwdriver installation isn't practical. Installation can be accomplished with the drive tool or using a bolt and jam nuts. When using the bolt/jam nuts installation technique, the slotted end of the insert can be either up or down.
You can install knife thread inserts by first drilling the specified hole size into your hardwood and then turning in the insert. If you're installing just a few furniture inserts, you can use a bolt and jam nuts for the entire process. All you have to do is thread a pair of nuts onto a bolt, then thread on your knife insert. From there, you can use a wrench or rachet to thread the knife insert into place on the wood. Once installed, you can loosen the nuts and back out the bolt.
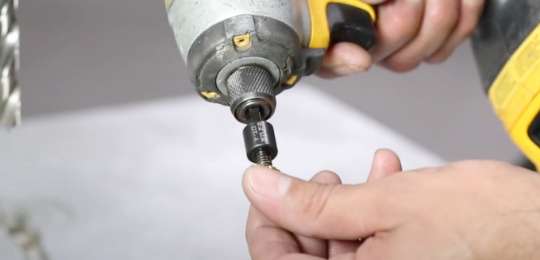
If you're planning for higher volume installation, we recommend using an E-Z LOK drive tool. For this method, you just need to attach the drive tool to a power drill or drill press, thread the knife insert onto the driver and then thread the knife insert into place.
If the wood you're working with is particularly hard, or if there is difficulty getting the E-Z Knife™ insert to thread in straight, these additional steps may help:
- Create a drive tool with full thread engagement for maximum control during installation (see below).
- Increase the hole size 1/64.
- Lubricate the insert with liquid soap or varnish
- Consider a stainless steel threaded insert.
Creating a Drive Tool for Hard Wood Inserts:
- Cut the head off a bolt with a similar thread to the insert's internal thread (can be rounded off for safety).
- Thread two nuts onto the bolt, followed by the E-Z Knife™ threaded insert (slotted end down).
- Put the bolt into a hand drill or drill press.
- Prior to installation, make sure the two nuts are threaded down to the top of the insert.
- Thread in the insert.
- Loosen the nuts and back out the driver.
Additional Tips for Harder Wood:
We understand that harder woods can make the installation of our inserts difficult. Please review the Jenka Hardness chart below for recommendation on how to install E-Z LOKs in harder woods.
Click image to enlarge:

Seclecting the Right Drill Hole Size
Selecting the correct hole size is critical for the best fit. Use our handy Drill and Tap (Hole Size) Charts:
Drill and Tap (Hole Size) ChartsWhy You Should Use E-Z LOK Knife Thread Inserts for Hardwood
Why are E-Z LOK knife inserts the best-threaded inserts for wood? Our threaded inserts for hardwood offer a more robust alternative to weld nuts as well as tapped holes. They're even able to provide a stronger bond than self-tapping screws.
Knife threaded screw inserts for wood are typically the strongest and least time-consuming fasteners you can use when building furniture, storm shutters, marine applications and more. Not to mention, you can install E-Z LOK knife thread inserts at nearly every stage of your project. They won't require any reworking after installation, so you can use knife thread inserts for wood even if your piece is already painted or coated.
What's the Difference Between Brass & Stainless Steel Knife Thread Inserts?
Brass threaded knife inserts for hardwood are a nonmagnetic, mildly corrosion-resistant and electrically conductive type of hardware, which is generally used as furniture inserts as well as in the construction of cabinetry and partitions. Stainless steel thread knife inserts tend to have a stronger resistance to chemicals, corrosion and are mildly magnetic. These are generally used for applications where your project will be subjected to more inclement weather conditions.
Purchase E-Z LOK Knife Thread Inserts for Wood Today
Are you ready to put our E-Z LOK knife thread inserts for wood to the test? Browse our entire selection to find the size and material that best suits your needs and your specific industry. When you know what you need, locate your nearest distributor to place your order and start your job right away.
Browse E-Z LOK Knife Thread Inserts KitsVideos Related to Knife Threaded Inserts for Hardwood
Take a look at some of our other videos to learn more about E-Z LOK products.
These inserts provide an ideal solution for putting machine threads in softwoods, like pine, MDF, composition board and plywood.
E-Z LOK threaded inserts for wood are ideal for applications where stripping or thread erosion is possible.
E-Z LOK solid wall threaded inserts are strong, easy to install, and self locking. Strong threads made easy.