How to Install E-Z LOK™ Threaded Inserts for Metal
When it comes to installing threaded inserts into metal materials, E-Z LOK's high-quality Solid Wall inserts are some of best components to get the job done right the first time. Once installed, these cutting-edge inserts by E-Z LOK offer a tremendous amount of durability for long-lasting use with a variety of applications. Whether you need to drill into magnesium, cast iron or aluminum materials, you can count on these fasteners to deliver the results you want when installing threaded inserts.
These innovative inserts come in both stainless steel and carbon steel options to meet the individual needs of each of our customers.
Why You Should Use E-Z LOK Solid Wall Threaded Inserts
E-Z LOK's Solid Wall threaded inserts have numerous benefits over traditional inserts that keep contractors and homeowners ordering them. As was previously mentioned, these strong inserts can be installed in varying soft metal materials. But, aside from these advantages, E-Z LOK's inserts also provide the following perks:
- They are self-locking, but can still be removed easily with a bolt extractor.
- They offer extreme resistance to vibration.
- These inserts have an adhesive that sets within 3 to 5 minutes once the fastener is installed.
How to Install E-Z LOK Inserts
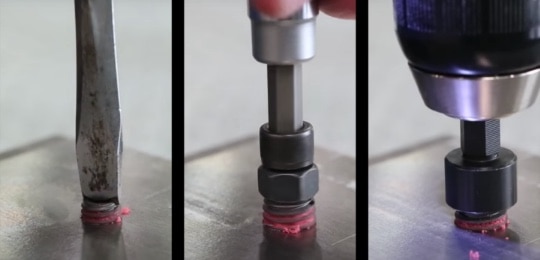
If you want to know how to install E-Z LOK inserts, the process is relatively simple. While our selection of E-Z Coil™ inserts relies on specialty tools for E-Z Coil™ fasteners, installing threaded inserts is a different story. To learn how to install threaded inserts in metal materials with E-Z LOK's Solid Wall fasteners, you must first use an ordinary drill and tap to create the hole itself. After the hole is prepared, you can then install the Solid Wall insert by using a bolt and jam nut, flathead screwdriver or threaded insert drive tools. Once the insert is installed, the preapplied adhesive activates and is fastener ready in 3-5 minutes.
FAQ About Installing Threaded Inserts
If you still have questions about installing threaded inserts, we're happy to help clear up any confusion. We want each of our customers to feel confident with their purchase, so make sure you contact us if you still don't know how to install E-Z LOK inserts. We also included one of our most frequently asked questions below to provide further clarification on information pertaining to our Solid Wall inserts.
Does the Adhesive in Solid Wall Threaded Inserts Melt?
When you install solid wall threaded inserts, the adhesive does not melt unless the insert has been exposed to temperatures of more than 300 degrees Fahrenheit. At this point, the adhesive dissipates to allow the insert to be fully removed from its hole.
Purchase E-Z LOK Solid Wall Inserts
Ready to see the difference that E-Z LOK Solid Wall inserts can make on your project? Take a look at our selection of top-quality Standard fasteners to find the right-sized parts for your specific applications. Then, locate your nearest distributor to place your order and get back to work quickly!
Browse CatalogVideos Related to Installing Threaded Inserts
View some of our videos related to installing threaded inserts or learning more about E-Z LOK's products.
E-Z LOK solid wall threaded inserts are strong, easy to install, and self locking. Strong threads made easy.
E-Z LOK Thin Wall inserts for metal require the use of a slightly larger drill than normally used with the corresponding tap.
Quick, step-by-step instructions for installing coil (helical) thread repair inserts from E-Z Lok.